
If you are a Pinterest advocate, you may have noticed that repurposing wooden pallets is all the rage in DIY-Land. Well I jumped aboard that bandwagon. The pallet-style coffee tables I had seen had all utilized rather large pallets that would probably take up all walking space in our little apartment. So when Josh found these three little guys behind a Mexican restaurant and brought them home as a "surprise," my mind started racing. I wanted to take what I had seen and make some adjustments. (side note: you know you are deep within DIY-Land when Husband brings home Mexican-restaurant-trash and you get all giddy)
Remember the pallets we stacked as a coffee table?

Pretty snazzy, huh?
Well I had bigger dreams for this guy. Dreams of rich stain, storage, and legs. I'm here to tell you dreams do come true! (Well, 2 out of 3 in this case) Introducing Sorta-Finished-"Special"-Walnut-Coffee-Table!

Mmmmm... Chocolate-y goodness... well really walnut-y.
Staining the three pallets was easy enough, though incredibly time-consuming. I definitely would have done things a little differently, and I'll give those tips at the end.
First, gather your supplies.

Enter: our new orbital sander DeWalt. We got this guys for $60 (no big sale or awesome deal to brag about, unfortunately), but we figured we were going to be needing a good sander for many future adventures in DIY-Land, so we may as well bite the bullet. We also got Medium and Fine grit pads.
Also included in the toolbelt:
- container of water (something disposable),
- rag (or 2),
- old paint brush (or 2),
- stain of choice (in this case: Minwax Ebony & Special Walnut)
- tarp (if you happen to have to do all this on a 3rd {though really 4th} floor patio)
So obviously you sand the wood first. I was really nervous/anxious throughout most of the sanding process because I was just waiting for any of our neighbors to shake an angry fist at me, and therefore kept checking over my shoulder and down through the slats of the balcony as if I were expecting the KGB to show up.

Luckily they did not. And after a while, I relaxed. I was so happy to find that this sander sucks in the dust and traps it for you. I mean, like, really efficiently. I was pretty worried the neighbors below us would come home to find all their patio furniture covered in... sander-dust? All in all... I was nervous about our first project in an apartment complex.

The wood was already raw, so I was just removing the grime and smoothing it out. I also dulled the edges in case any shins accidentally found them in the dark... or little nephews. This is a plank half-way through the sanding. Can you see the difference from the dark-grime to the light-ungrime?
Well I can.
(Side note: I had to hand-sand the inside spaces, which resulted in a pretty nasty splinter, thus half-heartedly sanding the rest of those untouched-by-power-tools areas.)
So once all three pallets were sanded, top and bottom and edges of each plank, mind you, staining begins. I used a technique that Sherry from Young House Love demonstrated in this tutorial. The irony? They used this technique because they wanted their new wood to look like old pallets. We already had the pallets in great condition, but I wanted more color from them. In the end, they don't look very "weathered"... just dark.
Anyway. This is how it went down.

First you use a brush to wet the wood. This way it doesn't absorb a ton of the ebony stain. It is best to go one plank at a time. Don't get overly-abitious or the water will soak in before you get a chance to stain.

Then you brush on ample amounts of the ebony stain. Be prepared for dripping and splattering. I looked like I had some strange skin disease by the end of it all.

Use a rag to wipe off the excess. It is up to you how much stain the wood takes in based on how much water you "pre-soak" with and how long you let the ebony stain sit. I sometimes did two ebony passes if I wasn't satisfied with the texture I got.

(Forgive my pasty legs and socked feet- the tarp was really hot and the socks buffered the heat)
Don't forget to get on the "inside" spaces, edges, and ends. I usually did something like this to easily access the hard-to-reach areas (aka-Splinterville or Untouched-By-Power-Tools-Land)

Here is an example of the difference.

And here is an entire-pallet before and after. Honestly, you could leave it at that. Maybe add some poly to make sure it is all sealed and call it a day. But not this gal.

I moved on to add Minwax Special Walnut stain. I experimented a bit with the middle pallet to see how dark it would turn out and if there were any tricks I wanted to try. I tried the same technique as the Ebony (water first, stain, wipe), but honestly, it had little effect because the Ebony stain was already working, thus repelling the water. So I gave up on any special antics and just directly brushed it on. Sometimes I would wipe off the excess, but that was mostly due to impatience.

(Again, excuse the pasty leg)
See the difference? Pretty noticeable this time, eh?
So then you just wait for the stain to dry (cause for one thing, it's pretty stinky)
Here are some pics of why the pallet that is on top is my favorite. It has some pretty spectacular details if you look hard enough.

Knots and Print

Cool waffle texture
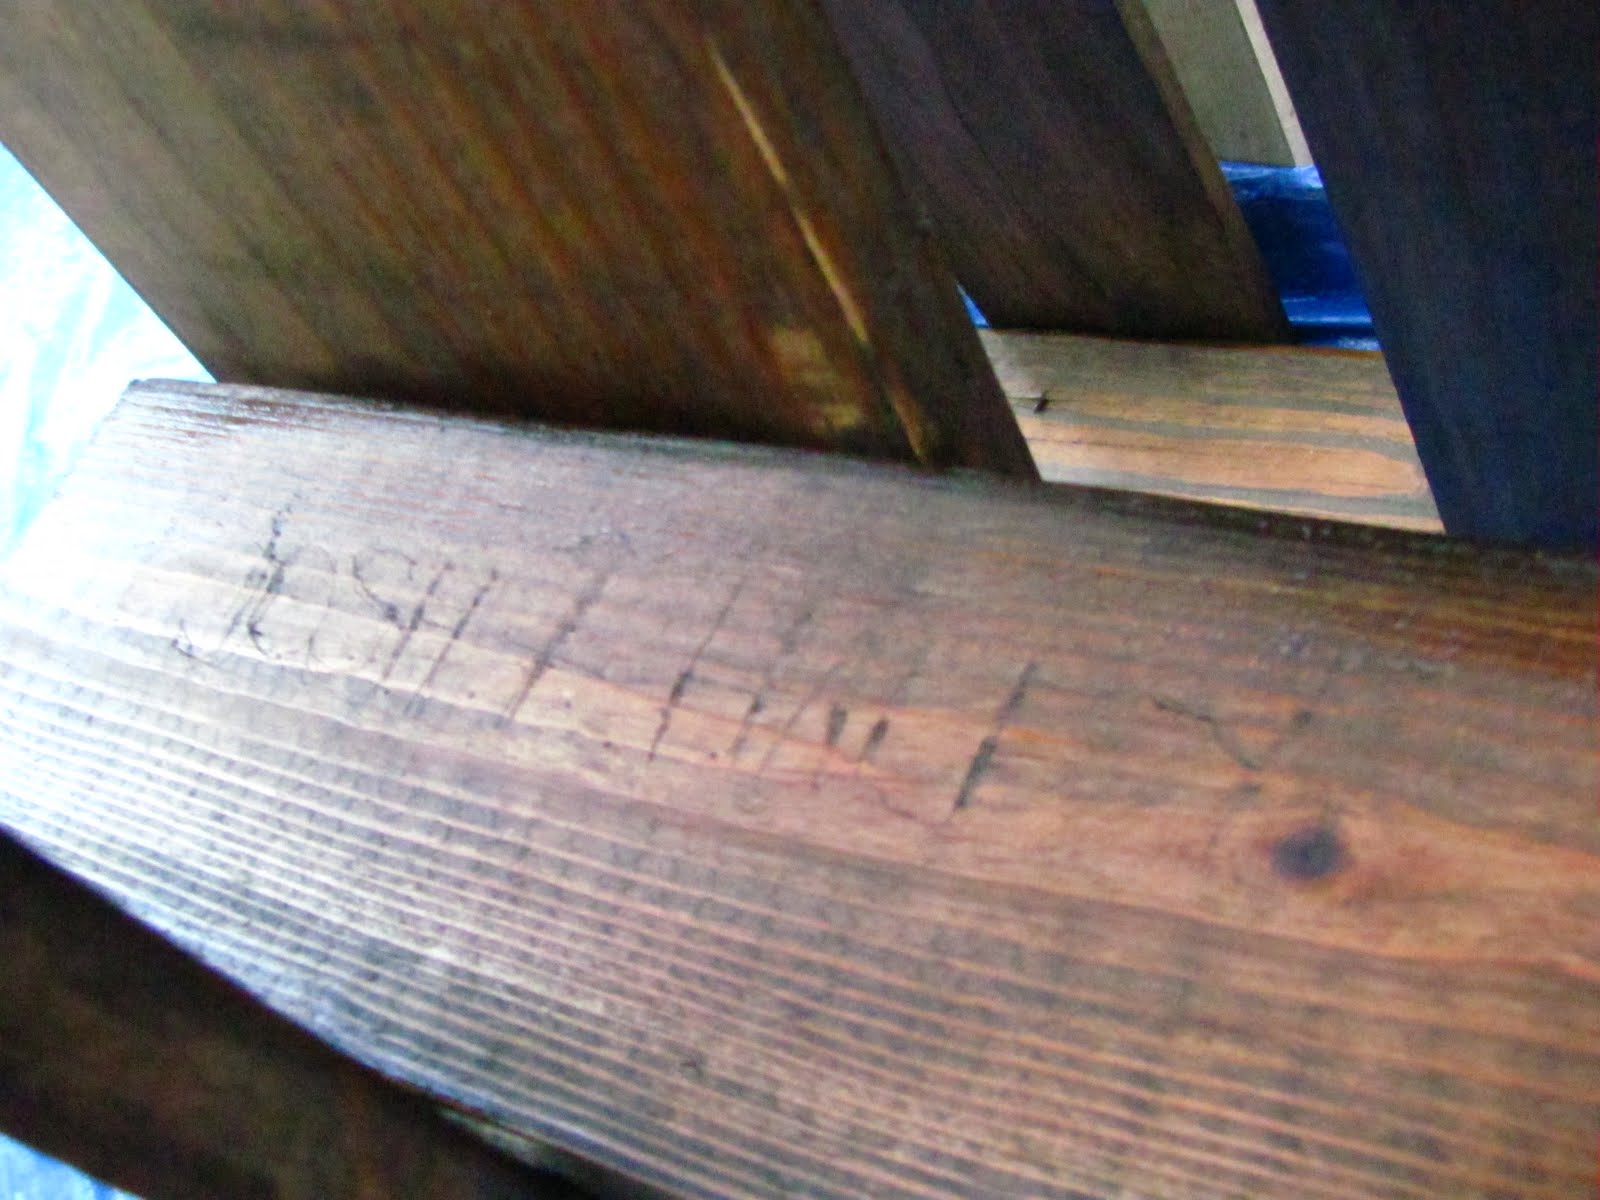
Did ya catch that one? I caved "Josh + Haley" into one of the beams. You can barely tell... but it makes me very happy. Disproportionately happy. Because I know it's there.
Oh, and while Josh was out getting groceries and such, I asked him to stop by Lowes and get legs. After much picture messaging back and forth to show me all my options (I probably should have just gone with him), he came home with these:

The shape vaguely matches that of the legs of the couch and chair. Since they are a different type of wood, I knew the stain would look different. But I made peace with that fact quickly because they were going to be in the shadows of the coffee table anyway.

So I painted a sloppy coat of Ebony (no water coat this time) and wiped it off.
Then coated them in the Special Walnut.
(No picture of all 4 fully-stained, sorry. But you get the idea, right?)

So that was about all I could do that day (Friday) until it all dried.
I noted how much more of the Walnut (left) I used than the Ebony (right).
In case you cant tell, I used probably 2/3 of the Walnut and maybe 1/3 of the Ebony.
I was a little worried about leaving them outside overnight because 1.) The stain is pretty sticky until it dries and stuff might stick in it, and 2.) it had sprinkled earlier and I was paranoid it might rain overnight.
So we brought them inside and made a little teepee of pallets in the living room (on a tarp so it wouldn't stain the rug) and put a fan on it.
Boy am I glad I did that. It POURED Friday night.
I'm pretty proud that I resisted the urge to mess with them before they were dry. I'm not one for patience. But luckily we were well-occupied Saturday around Nashville, so I wasn't even at home to think about it. When we got home that evening, we got back to work.

Installing the legs was very easy. They already has little screws sticking out of the top, so we just placed them were we wanted them (about an inch from the edges), pushed them into the wood so the screw would make an indentation, then Josh drilled a little hole where the marking was, and screwed in the legs.

And just like that, our coffee table had appendages.
So we removed the tarp and stacked the newly-stained-still-a-little-sticky pallets and viola.

The plan is to cut out part of the boards from the next-to-bottom shelves to create little cubbies, insert baskets, and instantly have storage. Hard to explain, I'm sorry. I'll just have to show you whenever we get about to actually doing it. First we must retrieve Josh's Skil saw from Hattiesburg. Oops.
Lessons Learned:
- I would recommend using a separate brush for the water. The two stains were fine for the same brush, but the stain left in the brush when I used water affected the outcome of the ebony stain. And it ruined the tupperware container that I used for the water because so much stain settled in (and I even washed it out a couple times in the process). A separate brush might have prevented this.
- Gloves wouldn't hurt, especially in the sanding process.
- Do all this in a well ventilated area, especially the stain. And read the cautions on the stain.
- Be prepared for splatter, spills, and other stain-related tragedies (i.e. don't paint/stain close to walls, directly on any flooring you value at all, in any clothes you aren't willing to throw out... or designate as painting clothes)
- Allow yourself plenty of time (It took me about 6 hours for the whole sanding/staining process)
- You might want to try completing one side or pallet then moving on. Meaning do both stains in one sitting. I went through all three pallets with the water/ebony process, then went through all three again with the walnut. It was daunting to have to do it all over again.
- Double or triple check that you got to every nook and cranny, edge, corner, and knot.
- We haven't poly'ed yet, but we plan to. This will ensure a protective layer from condensation-cups and the like.
- Take breaks or your neck/back will kill you the next day (speaking from experience). I sat down and basically worked straight through with maybe 2 five-minute breaks. What can I say? I get in the zone.
Budget breakdown:
Pallets (3)...............Free
Ebony Stain..........$7.50
Walnut Stain.........$7.50
Brush....................$1.50
Legs (4)..............$28.00
Total...................$44.50
(Not including the sander because it was something we were planning to get anyway, and it will be used many more times)
I admit, the legs are a little, um, ridiculous, but have I mentioned I'm a bit impatient when it comes to my projects? I just really wanted some pre-made easy-to-install legs. I probably could have FOUND something to used as legs had I waited. But all in all, a coffee table under $50 is a nice deal.
Check out these other ideas and subscribe to their blogs!
My friend Holley recently posted this uber-cute repurposed pallet shelf! I've been crushing on it, and even considered sacrificing one of my pallets for this purpose, but I was already so committed to my coffee table.

Or check out this post from Blue Velvet Chair that has several ideas for pallet freecycling. Some of them, though fantastic, are way out of my skill set. Others are a "someday" project. Perhaps when we have more room.

and

Have you seen any other repurposed pallet projects you love? Any plans to use pallets around your own house?
Stay Tuned, Folks
Haley
I love this Haley! :) Great job! I'm excited to see all your other projects in the future. I recently built a vegetable bed out of a pallet. The best part- it was FREE!
ReplyDeleteHaley- I just now saw this post! Thanks for the shout out! We also worry about our sawing/painting etc in such a close space (next to neighbors). I love your new coffee table and blog!
ReplyDelete