shabbyblog

Sunday, August 5, 2012

Simple Sixteen Cent Coasters

Yep, you read that right... 16 pennies per coaster (granting you have spray paint and lace already)

Our coasters were pretty dinky. Just your standard Wal-Mart coasters that my parents picked up when we moved in and didn't have any (Don't get me wrong, they served us well for a full year). After making precious little hand print coasters for Father's Day with my class at the preschool (you're welcome dads), I got to thinking. "Hm, that was really easy. Not to mention super cheap. I bet I could come up with something cool to go on the tiles." Thus the wheels started turning. I thought about using my new stamp letters for quotes, painting something, patterns, then it hit me. I love lace. LOVE it. I'd seen where people spray painted through lace with beautiful results, so I googled it, and what do ya know? There it is, the exact same idea in Martha Stewart


What can I say? Great minds think alike. 

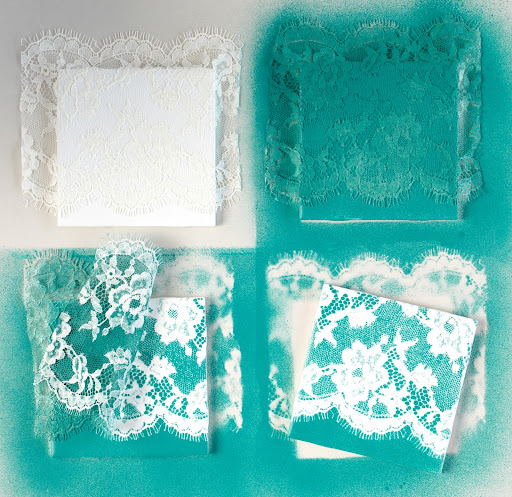
In her tutorial she recommends using a spray adhesive to keep the lace in place while you spray paint. I can see the advantage, but it really isn't necessary. I just laid the lace on top and sprayed through it. It only takes maybe 5 seconds, so my lace didn't move around. A couple times I tucked it under on the side just to be sure. After it dried, I turned it over and sprayed the bottoms as well. Just because. Then I sprayed a clear coat to make them shiny and extra safe from chipping.


I had this metallic silver spray paint from when I spray painted a bright orange lamp to a sleek silver. I'm loving the metallic these days. The lace is from Hobby Lobby a while back. The tiles are in the flooring section of Lowe's or Home Depot and are literally 16 cents a piece. I got six.


This is an example of tucking it in place (And my go-to spray painting protection barrier... aka - an old towel)


Viola! Sleek and chic sixteen cent tile coasters! I'm sure if I had used that spray adhesive, you'd have been able to see more details of the lace, but I really didn't feel like driving back out to Lowe's for one thing...


Okay, let's talk details folks. I believe that true DIY crafts are all about the little something-extras you add to personalize it or make it unique. Taking inspiration from several sources and meshing them together.

I used the aforementioned letter stamps to add our monogram to the back. Fits perfectly. 
I also added those little self-adhesive cork pads, which also fit perfectly in the squares (They are actually cupboard door stoppers and were about $2.50 for 32. Don't quote me on that)

What I love most is the coral accents on the edges. It adds just the right amount of interest. I had them sitting around for a couple weeks before I added the coral, and let me just say, it made all the difference. Before, they just didn't feel complete. Now they feel neat and colorful. 

Ahhh! I spy a baby booty!

I was inspired by Madigan Made's neon edged trivets. Also a very neat idea.


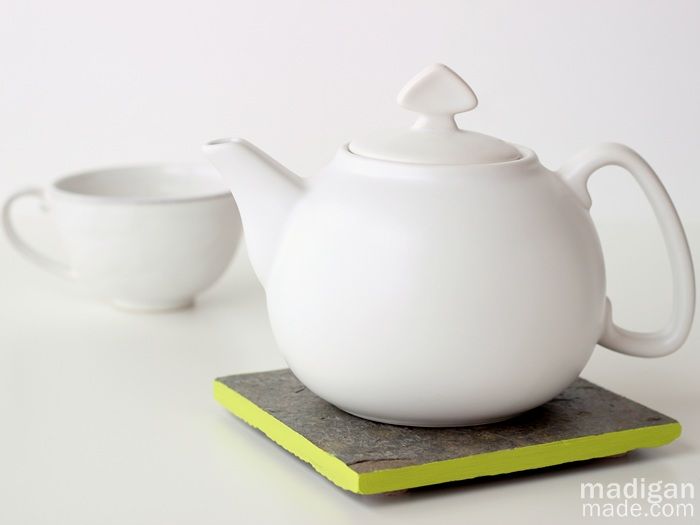
I didn't have any coral on hand, so I mixed some red and orange with a fleshy peach paint to get a lovely shade of coral. It's more orangey and less pinky in real life. And less neony.


Don't you just love that stack of vintage LIFE magazines? We bought several from 8th Avenue Antiques here in Nashville. They are from the 60's, and the one on top is my favorite! It's all about prizewinning pictures from that year. There is also one about the moon landing! One day I hope to be able to display them more properly, maybe in the office.  Someday.

Follow me on Pinterest @halesnoels

Stay tuned!
Haley

Monday, July 30, 2012

One year Nashversary

July 15th officially marked one year since we moved to Nashville!

We have definitely fallen in love with our city and here's why:
I kid you not when I say there's always something going on, somewhere to go, and someone to see. Nashville has something for everyone. Sure it's the country music capital of the world (or something like that), but I've managed to live here a year without encountering much country music craziness...Sure it's out there, but it's not overwhelming.

As a sort of New Year-in-Nashville resolution, I want to make an effort to get more involved in the community. The Nashville Scene is great about keeping its readers informed about community events, music, theatre, arts, and great dining. Lightning 100 (a local radio station which actually plays great music and restores my faith in humanity) does the same. They also sponsor most community events that are free to the public. Coming from a "city" in Mississippi, I do not take these guys for granted.

In addition to going to more community events, I also want to get involved in a volunteer organization. All through high school and college I volunteered various places (tutoring, animal shelter, habitat for humanity, mission trips) and I truly miss it. It's such a great experience. It is rewarding and challenging, it's humbling and something to take pride in.

I celebrated my Nashversary with these friends (who happen to be from Mississippi) (Josh was out of town) by going to a Nashville landmark bar 3rd & Lindsley to see a great band (who happens to be from Mississippi). Irony aside, it was a fun night.


Here's to the next year!
Stay tuned,
Haley

Sunday, July 8, 2012

Tea Dyeing Tips


 I know I said I'd do a post about tea dyeing my sheets, so here it is (months later). I wanted to do this because I couldn't find much information online when I started researching, so hopefully this will help someone else dye their sheets/drapes/pillow/dress/etc. 

The method is pretty straight-forward, that wasn't the hard part. 
Step one: brew black tea (such as good ole Lipton's)
Step two: submerge your fabric in the tea
Step three: wait as long as you want
Step four: remove, rinse, enjoy (your new tea dyed fabric, not the tea itself)

I wanted to do my sheets because they were whitewhitewhite and my quilt is an off white. It looked bizarre, as demonstrated by the poor quality picture below.


I knew my sheets wouldn't fit in my big pot I used to dye my lace curtains, so the tub was the only option. This was one of my unanswered questions. 


Q: Will the tea stain my vinyl tub? 

The short answer is yes
However, when it was all over, (it ended up taking several hours) I immediately let the water out and scrubbed that sucker. And you know what ended up saving the day (again)? The trusty Magic Eraser. They don't play around. So my advice is this:
A: To avoid stains, act quickly and scrub with a trusted cleaning solution


Q: How long should I soak my fabric?

A: It really does depend on the fabric. Natural fibers work best for dyeing. When I stained my curtains (which are polyester) I only needed them to be a little duller than they already were, so I did about 10-12 minutes and let them dry outside. 

The sheets (cotton) took much longer because they were very white to begin with, and there was much more fabric involved. I used a pillowcase as a test, and I left it in for 45 minutes. See the difference below:


 When I did the rest (sheet, fitted sheet, and other pillow case), I left it in there for about an hour... two times. (More on that later) I recommend stirring things around (with a wood spoon... I don't recommend shoving your hand into lava hot water) every 10-15 minutes to make sure everything is submerged (air pockets push areas up).

After about an hour (maybe even a little longer), I used my husband's man-strength to lug my sopping wet sheets to the dryer for the spin cycle. 

Q: Should I wash my sheets immediately or will that undo the stain?

A: Dry them first to set the stain, then wash normally.
I couldn't find much information, so I called my mother-in-law (AKA the Stain Terminator) to ask about tea stains. She said even she has been hard pressed to get a tea stain out once it has dried and really set in.  I didn't want to risk it, so I used the spin cycle then dried them to set the stain first. I then put them on my bed and huffed and puffed because they weren't dark enough. When they were wet they looked much darker (makes sense)... So I decided to do it all over again.

Yep... I brewed a whole new batch of tea and started over. 

Q: How many tea bags should I use?

A: Again, totally up to how dark you want it, but I used at least 6 for a set of sheets in a tub (each time). For a smaller job, such as the curtains, I only used 2 in a big pot. 
I used my huge pot to boil water with all the tea bags in it (dipping them in and out helps move things along), then I poured the tea into the tub. I added water from the faucet (fortunately our water really does get lava hot) until I thought there was enough to cover the sheets. Then I threw the sheets in, tried to get rid of some of the air pockets, and let them stay in for another hour. 

Spin cycle, dry, put them on the bed with fingers crossed, and hurrah! I was happy. Then I took them back off and washed them properly, detergent and all, with fingers crossed that it wouldn't undo the last 3+ hours of work. 


Not a great picture, but they are just about the same shade of off-white now.

Q: Will my sheets smell like tea, thus will I smell like tea every morning?

A: Nope! Especially not after you wash them.

I haven't had any problems since tea dyeing my sheets. It's possible they have lightened a bit, but nothing noticeable. There has been no smell, no skin irritation, I have washed them several times since. So if you have something that it a bright white and you wish to give it a softer, more worn or antique shade, I highly recommend tea dyeing. If you have any other questions, I'd be happy to try to answer them!

In other news:
I took a glass-blowing class! It was a Groupon find. Nashville has some really great deals on Groupon (more than just pedicures and restaurants) and I have always though glass art was so interesting and under-appreciated. I have also taken a class on stained glass. I made this little tumbler with my own two hands and lungs.  


Try something new. Take a class on wine tasting or cake decorating. Check out your city's Groupons. 

Stay Tuned, 
Haley

Saturday, July 7, 2012

Removing the Temptation of Television

A while ago, Josh and I made the decision to move the TV from our living room. Now it is in the office, and Josh uses it as a monitor to work on video editing. We can still watch Netflix and movies in the office, but with it out of the living room (which is where we spend most of our down time) the temptation to laze around all day/night/week is gone. Now we listen to music, read, talk, cook, I do some projects I've been putting off, Josh works on websites or videos. All in all it has been a positive change for our family. It was hard to admit how easy it is to waste hours sitting in front of the TV and let my mind just melt away when I want to (and should) be more productive. 


Now I feel like I have my living room back! The TV was sitting on top of a black book case where the gold chair now sits. It was big and dark and took the focus of the room. Other new additions are the all-white clock {love} from Target for $7. It's very reminiscent of this one from Crate & Barrel for $50.


Another update is the wooden folding chair to the left of the fireplace. When my sister gave it to me it was a dark green, and under that it is red, and under that it was black. I painted it grey, stenciled it with white (same stencil from my table), and sanded it down a bit to distress it.


So I'm here to challenge you to unplug your TV and see what happens. Try a week, a month... And let me know what changes. Maybe you wont even miss it. With the TV gone, maybe you'll be hearing more from me. 

Stay tuned, 
Haley


Sunday, April 8, 2012

Let's play catch up!

I know I know, it's been a while. Here is a brief update of what's been going on.

While it was still cold, I made an ear warmer headband from this tutorial by PrudentBaby


I found a great deal on more wooden crates to add to the collection.


We've gone to see this cool bluegrass band called Off the Wagon at the Station Inn. That made me want to learn to play mandolin. 


I made a kinda-sorta costume for Read Across America day. It's supposed to be Max from Where the Wild Things Are. Basically I sewed ears onto this fluffy white jacket I found for $8, and I made a crown.


One of my neighbors lost their kitten so I got to hang out with this cute guy one afternoon.


I got this awesome wreath made from wood shavings that I'd been eyeing at Target, and I found it at TJMaxx for cheaper. Also, you may notice I hung the drop cloth garland above the bed. 


My man had a birthday. (And my Max crown got some extra use as a birthday crown!)


We have been doing some spring cleaning/sorting/simplifying.


The mantle got a spring update.


But the most exciting update is our urban garden that is thriving on our back patio!
We went to Lowe's and stocked up with strawberries, bell peppers, cucumber, zucchini, spinach, romaine lettuce, and a tomato plant. We also got this beautiful anemone flower and a plant called sea pink. 


Luckily we already had most of the pots we needed. We repurposed an old kitchen island what we no longer had room for as a plant holder. (You might notice it was on the far side of the bed as an ugly side table)


Now they are getting so big! It's been great since our patio gets full sun, and that's exactly what they need.


And we have evidence of our first fruits!


I tried my hand at tea dying. My first victim: a pair of lace curtains.


One found a home behind the ladder. The other is on the lone window in our bedroom. It is lovely to wake up to each morning. 


My next victim was our new set of sheets. Hopefully I'll do a full post about this process. 


Oh, and I collected a bunch of those little pink helicopters. They will now and forevermore be known as "fairy wings." Because that's what they look like. And I'll tell my kids that the fairies shed their old wings at the beginning of each spring and get a new pair. Or not. 


So yeah. Now you are up to date on my life. Kinda. 

Tomorrow I start working as a young toddler teacher at the preschool. I have been explusively in the infant rooms since November, and you better believe I'm going to miss holding those itty bitties and hanging out with my infant coworkers. The plus side of moving rooms is that I'm getting awesome hours! I'll be off at 4 every day. I hope that helps me be more productive this summer.

We'll see.
Stay tuned,
Haley

Tuesday, February 14, 2012

DIY Cloud Puffs

aka tissue paper pom-poms
I did these a while ago, and I just love them so much. They are easy to make, but a little time-consuming.

A close up

A view from the bed

Aren't they magical! 

Want to make your or your kids bedroom a little more dreamy? All you need is some tissue paper (the kind you put in gift bags, not for wiping your nose), scissors, and some sort of string/twine/ribbon/fishing wire. There are a ton of tutorials online, such as this one on Martha Stewart's website.

Here's the gist:
-Stack some tissue paper {6-8 sheets} and cut it to the size you want (I did 3 sizes: The whole sheet, cut in half, and somewhere in between-featured below)


-Fold them accordion style {1-1.5"} (I played around with how big or small the folds were.)


-Cut off the ends in the shape you want, such as rounded or pointed. I learned the hard way that you shouldn't try to cut too many layers at once. Literally broke my scissors.

Doesn't have to be perfect

-Tie your string around the middle.


-I added a step. When you spread the "wings" out to start separating each layer of tissue, It helped me to cut down the middle so there are 4 "petals" to work with.


-Carefully separate each layer.

I did have a good bit of ripping. At least one tear on each pom, but it doesn't really show.

 I found that running my fingers through the folds enabled me to get closer to the center.

-Remember to do half then flip it over to do the other half, otherwise it would be flat-ish on one side. But that might be cute as a table centerpiece.


This project is so versatile. You can use any color or patterned tissue, as big or small as you want. Make a vertical wall of pom poms, or a horizontal stratosphere of cloud puffs.

I even added a little sparkle to a couple of them with the Glitter Blast my mom-in-law got me.


Here are some pictures of poms that other people have made:


As for Valentines Day... I have pneumonia. I haven't been well in a long time, but when I had a consistently high fever the last couple days, I knew it was something more than just a sinus infection. Sure enough, after a chest x-ray, the doc confirmed my suspicions. I then had the privilege of driving myself to 3 different pharmacies because one of my prescriptions is new or rare or something. I was a wreck. At one point my box of Kleenex fell to the floorboard and out of reach, and I just started sobbing. Le sigh. It's hard enough to be sick, but to be sick and alone is even worse. (Josh is still out of town). My mom is supposed to be driving up here tomorrow because she is a gold-star-mom.

I hope you all are well and happy this Valentines Day. 
Take your vitamins.
Haley